Wednesday 24 October 2012

Bargain Basement

It has been a busy summer, working and trying to fit in getting in the most of the warm weather.  I have finished a few projects and some I even remembered to take before and after photos of....one day I will find the time to get this right!
So one of my favorite holidays quickly approaches...hallowe'en!! I love decorating almost as I like to scare!  And that is where this scary undertaking begins....the basement!!  Half of our basement is builder finished the 2nd half not. And of course this is where our office is, our workshop is, storage is, furnace is, and lastly and most important kids/teens hangout is.  This unfinished space has seen alot of uses over the last 13 yrs so time to make it truly useful

Ugly !
The Inspiration
It was suggested that our 14 yr old daughter have her first house party for Hallowe'en...by me no less what was I thinking!  Over the last 2 yrs the space had become a dumping ground for all our "stuff" . Exposed floor joists, water pipes, wire, duct work, concrete floors....ugly ugly ugly so I challenged myself....lets see what I can do with the least amount of money possible to make a comfortable place for my teens and their friends to want to hang out in. So this is what I started with...Apart from a mess and too much stuff...the lime green was on one wall from 4 yrs ago so that was to stay so I googled ideas for what to possibly do with an overly bright lime green wall and came across this amazing wall sticker company in France ACTE .  The inspiration was set! Existing wall unit was moved to sit as divider between work shop  teen area.  Short wall was painted mixing a quart of demin blue paint with some other blue paint I found tucked away.  Lime green paint was found in our stash and opposing wall painted. Now for the inspiration....sand colour.....yuck!
First Attempt///Yuck!
 It got lost so I called a friend who had just painted her sons room purple...with a 1/4 gallon left!!!Now that is what I was looking for!
 Next was the ugly concrete floor...with  only 9 days (and not 5 full time days either) to accomplish this make over start to finish, it was decided to paint it. This would allow area rug and dance space for the party and still keep costs down.  Painted with Behr 1 part epoxy paint~it went on great but the drying time between coats and furniture placement put a huge time constraint on us but I think I was worth it!  Leather couch and love seat were found for free on Kijiji from the nicest man moving out of the country.  Coffee table was given to me years ago by a friend also moving although had I had time and weather been on my side I would have painted it! Lamp was found in the garbage and it got a new shade from a lamp long gone and a quick paint job.  Bar fridge was purchased by us off of Kijiji a few years ago to help out a friend whose fridge died and needed one quick.  Ceiling lights were from other parts of the house when lights had been updated. Dimmer switch was on clearance at the local HD was an extra bonus. Floor joists were covered with drapery scarf and duct work was painted over with some Whisper White paint left over from yet another job. So at the end of the day my actual cost were $83.04 and my kids love it! Just goes to prove that by being resourceful and taking items from other places in your home you can do a room makeover for under $100. Next Up our office/workshop space!

Monday 9 April 2012

From This Old Chair

Warm weather is here but is it here to stay?! Time to get in a quick project that I have wanted to get to for years.  It goes with my love of old chairs. Hey who am I kidding chairs period.  I was going to repair/refinish a chair I found tossed aside but it was beyond repair so I saved some pieces with a project in mind.

It went together exactly how I envisioned it would. With the laundry/mud room re-done it would look perfect painted black but to lose the old paint was almost a crime. I decided to do almost  a dry brush of black paint which turned out perfect for it let the older paint show through. Now I have a key problem, that being that my keys are never ever where they are supposed to be when I go to get them.  Solution was simple I thought ~add something to hang keys from.  I wanted uniqueish (ahhh a new urban dictionary word!).  Tried bending some old silver plate teaspoons...they broke.  Next forks....after trying to bend the tynes into hearts it looked more like the forks had been through some horrid dishwasher war and lost. So the shelf sat waiting to be finished for weeks until a broken faucet came into play.  My mother's faucet needed to be replaced so hubby and I went over to change it out for her.  As usual one thing led to another and a pipe leak sent me down to my fathers workshop in search of a washer.  As I rummaged around I found them. Not sure why he had them or even how old they are but they were perfect! I never thought I would be using tuning pegs from a guitar as the key holder part. I think my mother thinks I have lost my mind but I love it! Thanks Dad! Love you and miss you!
(10 in 7)

Monday 2 April 2012

One Thing Leads to Another

I found it! A blog name that reflects everything around me and my life!!!!!

Makeup Brushes ...One thing just leads to another

With the makeup vanity table done, or so I thought, one thing just lead to another which seems to be the way in our home. No complaints because it leads to new ideas.  Gotta keep the brain cells active as my mother tells me! Our daughter wanted something to store her makep brushes in.  The weekend found me at home depot (quel surpris!) Lucky for me the dollarstore is just a few stores down the way.  A glass vase, vase filler and some pink crystals.....she was thrilled!
Follow Me on Pinterest

Friday 30 March 2012

Paint Chips Birthday Banner

Its re-useable, one of a kind & personalized and lastly free! So I was tired of hanging the same Happy Birthday banner every year so this year everyone in the family will get their own personal birthday banner in their fav colours! Since paint chips are so versitile in creating banners why not a happy birthday one. I absolutely love using fishing to string everything together.  Not only do I have an entire spool that will never be used for fishing it gives the banner a floating effect. (I left out the name of my daughter...well it is the internet)

Apologies to my man for not thinking of this for his birthday, the first one in the calender year but I promise he will not be left out!

Makeup Vanity Make Over

Our 13 (now 14) year old daughter wanted her own makeup vanity table.  Knowing the chances of her spilling something and our adversion to painting an antique we came across this....

It wasn't in too bad of condition.  The entire piece was sanded and painted and came out looking like this
The stool, which I did not get a before picture of unfortunitly, I wanted to be as unique as she is.  Lucky for me I had fabric left over from her room make over 2 years ago. After almost 5 hours of cutting strips of fabric and sewing it turned out exactly how I envisioned it would~ she said it looked like a cupcake!


I got the inpiration for the top from how to shag pillows from vanessa christenson   Our daugher has a unique piece of furniture in her room that she adores and we are thrilled with the end result.


Sunday 18 March 2012

A Quiet hour for a book wreath

No kids & husband not feeling his best, house cleaning started but some me time was in order.  I saved the pages out of the book I am making into my recipe collection but what to do with them?  I saw this idea posted numerous times on various places on the internet so this is not an original idea.  With the torn out pages I made cones (in between dusting and texting a friend) Note to self that cones come out more uniform without interruption lol.  I had a piece of leftover styrofoam insulation which I marked two circles on.  The outer circle is approx 8" and the inner circle 4".  After most of the cones were made held together with some regular scotch tape I stapled each cone 1" from the bottom making sure the tip was centered. With glue gun in hand I glued the outer edge first using the staples as a guide to glue them to the line.  Next the inner circle was glued in place.  Finally an inner circle was glued in place lining up the staples with the tips of the cones of the 4" circle.  Now to put something in the middle. I tried a pom pom to make it look more like a flower but that didn't work well as I didn't have wool and curly ribbon was too stiff.  Next was a Coke can. I cut off the top and made 1/4 slits to the bottom.  I curled each strip around a pencil.  Cool look but it wasn't big enough.  Lastly I went with dried hydrangeas from the garden.  Cut and glued them in place and happily it was more the monochromatic look I was looking for.


Recipe organization continues but this was a nice break

Saturday 17 March 2012

In the Spirit of St Patrick's Day

In the spirit of St Patrick's Day and the ever paint chip .... I noticed people making banners out of paint chips mostly for Easter so I began to think.  Although I am not Irish at little decoration doesn't hurt especially here when we are in between seasons and everything is just kinda blah out.  So on my last trip to Homie D I picked up a variety of paint chips in multiple shades of green.  I drew out a shamrock on one to use as my template and began cutting out shamrocks.  Using fishing line to string them up the result was...


I didn't take a pic of the whole string because due to the damp weather a lot of the shamrocks began to curl so note to self that any future paint chip garlands will fair better inside.
(6 in 4)

Saturday 10 March 2012

Recipe Organization-What have I started?!?!?!

So on yesterday's outting I picked up two free books.  One I made into a book ball which now graces my piano.  The cover of the second book held a certain appeal to me and I decided to keep the cover.
I love to cook and try new recipes.  Much to my embarassment my recipes are scattered everywhere.  I started a semi-organizational plan.  I have a recipe book that ou add your  fav recipes to however it is old, overstuffed and falling apart.  Awhile ago I decided that recipes I wanted to try went into a file folder...it no specific order....once tried and it was approved it went into "the recipe book".  Since it is already bulging and the categories didn't exactly match my classification of recipes it was to say the least a mess.  I tried keeping recipes on the laptop however all that did was add another space to store stuff.  A cabinet in the mud room holds even more recipes. I am sure I have more packed away even with my attempts to downsize them. A disorganized mess is all it is.  So my free little book is going to be my solution.  Well that combined with a file folder and the laptop.
My recipe mess....

So it begins turning my little book into my recipe saviour.  I spent the evening removing pages from the book.  Since I am going to add recipes I figure I have to remove some paper to add more.  I spent part of the day sorting through recipes.  This was going to be a little more complicated and time consuming than I thought.  First dilemma was how to cover the words on the page if my existing recipe was too small.  Scrapbooking paper was the answer! Next was categories.  I made a list that was logical for me.  Next was how to divide up the book into the categories.  I have more cookie recipes than I do salads so the logical step was to gather all the recipes ready to be inserted and see how many I had of each of my categories.  Add to that that I have to leave enough space in each category to be able to add recipes.  This is going to take alot longer to organize that I had originally thought.
Some recipes that I had written out were too big for the book pages so I set up a template on Microsoft word and started typing.  Goal is have all my favorite recipes in a compacct book.  Ironic that little book is a Raders Digest compressed book. 

Friday 9 March 2012

Reader's Digest Condensed Condensed!!!...New Use for Old Book

Today was a run the errands kind of day.  With husband in tow, it was banking and grocery shopping.  When I mentioned I wanted to go to the ReUse Centre he was curious especially when I said I needed a book.  With chores out of the way we headed off to the centre.  The books I have I truly treasure so I needed a hard cover book that needed a new home. The Reuse Centre located in Burlington was started to divert items that people no longer needed from the landfill.  A noble cause.  In the entry way they have books for free. I was looking for a very specific kind of book, a hardcover book of music as this project was to sit upon the piano but none were to be find in the book section.  On our way out I grabbed two books from the free shelf and we were off to our next stop. 
My inspiration for this project was from Saved by Love Creations where she made a vase from an old book.  The look I thought was so unique but the vase shape was just not me...So it started with

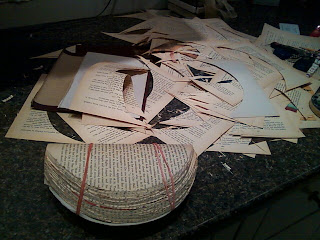
First I measured the first page to find the centre length of the book. With a compass I drew a semi circle
With knife in hand I started cutting away  the pages.  About the time I started my children saw what I was doing in shock as I have always tried to instill in them a love of books and here I was cutting one up!
Once I was finished cutting away all the pages away the cover needed to come off. In this case it almost fell off.  Some glue inside the spine and all over the first and last page.  Some elastics to secure everything during drying time
When dry....perfect!
Did I mention I picked up two books......

Painting Pyramids

It has been an exhausting week trying to balance work and life.  Alot of plans to create and re-create just no time to implement. 
Installing a home office recently gave rise to my version of painting pyramids.  How many times have I painted something placed on newspaper only to have the newspaper stick to the edges or could not completely get around the edges. So you prop it up off the paper using scrap pieces of 2x4 or what ever is available.  Painters pyramids are available from a variety of  sources.  These are from Amazon...

My version were used in packaging cabinets to protect the corners. 


Next I have to stop using camera phone for this


Friday 2 March 2012

Re~ Invention Design

Trying a new name for this blog~Make it and Mayham reflects my life but ReInvention Design is more me and perhaps this blog I think.  I still intend on doing one thing a week but not so much a craft.  Perhaps I am old school and think of crafts more as cross stitch & crocheting.  I like to reinvent things, make the plain stand out and try to look at things out of the box.  Bold I am not but I do know what I like. We can all have beauty & style in our homes for little $ as long as we are creative in the materials we use.  A person's style is defined from within.  A person's home should reflect their personality and that truly defines it as place where the heart is.
That being said Fridays are now Frugal Fridays.  Point to ponder is the line between frugal and cheap.  Frugal is money conscience whereas cheap is an unwillingness.  An opinion of mine which could very well be wrong.  So frugal Friday starts with curtains.  We have a wonderful friend/client who after having the whole main floor of her home renovated needed new curtains.  The curtains were to span a dining room window and sliding patio doors.  After shopping around she was shocked at the price of curtain rods.  My suggestion pvc pipe and a can a spray paint..she was thrilled!  Corks were inserted in the ends of the pipe after painting, finials from Habitat for Humanity screwed in and she had custom rods for less than $25.

Thursday 1 March 2012

New Month ~New Revamped Scarf

Day started out with sick husband and sick clients.  A day off work for me! Looking at a donation bag that I was getting ready for charity I looked at a scarf half sticking out of the bag.  A shame to give away a scarf that I had barely worn.  It was a gift and not really my style.  Fact is the scarf lacked style.
Digging through my fabrics and some jewellry.  Needle and thread and voila! My give away scarf is now a keeper!

Tuesday 28 February 2012

Latte au Lint

Still gathering supplies to make my daughters necklace and severely doubting my jewelry abilities my day was brought down a notch by winning a "Please Play Again" courtesy of Tim Horton's roll up the rim .  Although I did thoroughly enjoy my coffee! Looking at laundry sitting waiting to be put away I thought it would be nice to have a container to put the dryer lint in not having a place for a garbage can in the room and frankly too lazy to carry dryer lint to the kitchen green bin.  The laundry room also serves as a mudroom and a passage way to the backyard so people are in and out of there constantly.  Knowing my Timmies cup would end up in the green bin anyway I thought of a way to reuse it at least one last time before it goes to the composter.  Glue Stick, scissors and some left over giftwrap a quick sleeve was made  Not overly exciting perhaps but it solved a problem, doesn't offend the eye and it cost me nothing.

Sunday 26 February 2012

Some Many ideas so little time....

I took a new approach to my challenge...create what I need first, what I already have to work with two and lastly some fun things I just think it would be cool to make and have.  With list in hand there was only one thing missing...time! Weather also plays a roll because a few of the things I would like to undertake I need to be outside in warm sunny weather.  With relocating to Arizona not really an option  I decided that if I make/create 52 things within 52 weeks I have still satified my challenge.
Out shopping today for a prom dress for Katee and she pointed out a necklace that was fun and different.  After a closer look I decided that on sale for $21.99 wasn't a great deal and it looked like it would be fairly easy to hack.  Now for any experienced jewellery making person it would indeed be easy however my jewellery skills are limited to making gimp bracelets at church camp so many many years ago.  This should be interesting!
Goal for this project is to use whatever I can find around the house.  On to the scavenger hunt!

Wednesday 22 February 2012

A Blog by an any Other Name....

As I progress through week 2 I realize a couple things...I gave this blog the wrong name.  I want to make things for my home, my family, my friends, and my clients.  I want to reuse things that are still useful and are not ready for what I think we are too quick to dispose of. There are things we encounter over our lives that for whatever reason stay with us.  I remember reading a book I believe was by Lawrence Sauders where the wealth of an inventor or company was based on making an item an everyday thing and make it disposible so that people would always need to buy it.  Disposable pens, disposable razors are the first to come to mind.  Ingenious! My first response...but there are items that we use that can be reshaped and incorporated into other things. There is craftmanship that seems to be unappreciated to the today mass markets.  Dove tail joints are now passed by for soft close drawers (which are very nice dont get me wrong) How often does someone ever comment "Nice drywall work" or want a Victorian style home with open concept lol.  I also don't believe all the things I am on my way to making as crafts but that will have to be seen.

Tuesday 21 February 2012

Tween Bling Table Lamp

While I figure out my next project~I am rather proud of this one....With probably less than a month till Christmas I decided to paint a couple bedrooms and a hallway or two.  New Year #2 resolution is never untake painting projects with less than 60 till Christmas!
One of those bedrooms was my youngest daughters.  Going from robin egg blue with a huge Disney Princess mural to a soothing light purple and white.  We picked up a metal shelf from the local re-Use store, painted it white and it was perfect above her white day bed.Perfect all for - it needed a lamp!

The size was perfect but lacked bling.  Remembering stickers I had found at Walmart for a previous project, the result was...BLING for a tween!


Monday 20 February 2012

Two of 52 Well Maybe just 1½

Two of 52 Well Maybe just 1½

 Being in the business that I am I easily accumulate leftover material.  Actually it accumulates too easily!  Out shopping I spied a cute little plant left over from Valentines Day clearing for a mere  $2. Such a cute little plant deserved a nice pot to spend it's remaining days in.  Although I love plants ~indoor plants seem to have numbered days in the house.  So the weekend started out with...
First the metal flowers and bee had to go.  With pry bar in hand I quickly discovered that someone got a little over enthusiastic with their solder! The blue flower went the way of most of my house plants~the pink flower and bee have been tucked away for some unknown future use.  I knew that normal tile adhesive would not adhere well to the metal so I had a quick look round to see what else I had on hand.  I ended up using LePage's No More Nails to adhere the tile to the bucket.  Feeling kinda lazy and it being February in Canada I didn't feel like dragging the tile saw out to cut tile so I dug through the scraps to see what would fit thinking the gaps would be filled with grout anyway.  With tile adhered I decided I liked the look without grout.  I wish I had cut the tile to overlap at the corners ~This might have to be a do over.

Saturday 18 February 2012

Week One...51 to Go!

Week One...51 to Go!


Inspired by a post on one of my favorite sites www.curbly.com I started my first of 52. It was easy and cost was minimal...$4.26 for the frames from Dollarama.  The colour choices I realize are not to everyone's taste however I made them to co-ordinate with my son's bedroom that was painted just before Christmas. For this I used C-I-L and Behr paint chips.  Using my guillotine I cut the chips into 1/8 strips length wise or there abouts. With a glue stick in hand I glued them down in random directly on the paper that came with the fame.  A little trimming and I stood back with a grin! Abstract art for a teen's room....perfect!
Paint chips have been in my life for a long time and I see them being part of the 52 week challenge more than once. I even have them guessing at Home Depot what I was doing with all the paint chips~can't wait to show them! Thinking that some of the ideas I have come across using paint chips can be used as seasonal/promotional material in the paint department....omg my next blog! projects from each department of Homie D....but for now focusing on week 2!

And So it Begins

Inspired by stumbling across a new web site, a house and garage filled with inspiration materials (awaiting inspiration) I start this goal~ 52 crafts in 52 weeks.  Hoping most will be original but there are so many people out there with amazing talent it is going to be difficult to not to try at least some of the ideas I have come across.  I feel like "Julia Julia" of the crafting world.  I hearby give this blog the name TAT.  My nickname as a child and I as I am very sure every new thing I try will have more than its share of Trials And Tribulations!
As I said I want to try to be original as I can however when I do use some one elses ideas credit will be given
I start this for myself and look forward to looking back in a year and seeing where this has taken me. 
Apart from 52 in 52 my goal is to 3R as much as possible....let the fun begin!

PS As I tell my husband what I have embarked upon not 5 minutes pass and he tells me "Julia Julia" is on TV and laughs...This is meant to be!